Replacing an Old Outlet
June 11, 2020 4:14 pm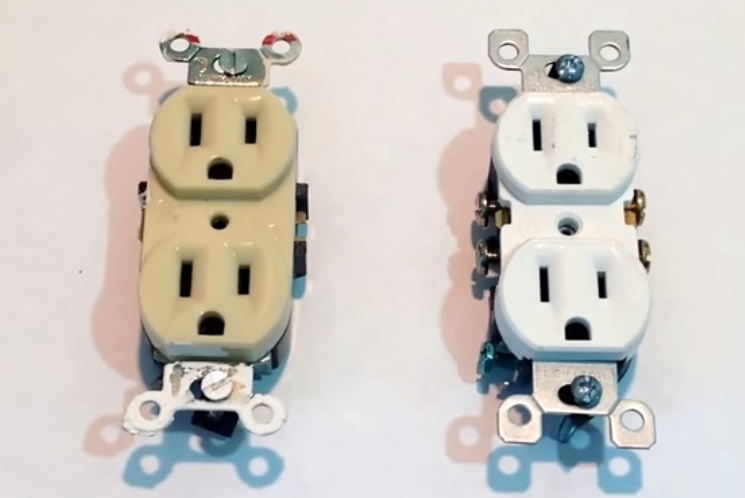
Replacing an Old Outlet
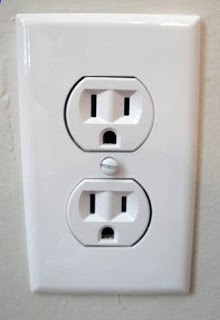
There are a lot of new homes and new construction going on here in the South Bay, but we still have a lot of older homes too. If you live in an older house, most, if not all your outlets are almond colored, and many are so worn that they won’t hold a plug anymore. Not only is this unsightly and frustrating, but it is also a fire hazard. Even if you like how they look, old outlets should be replaced safety reasons.
Many of us would never think of taking apart or replacing these outlets on our own. If you don’t know how to work with electricity it can be intimidating. That’s ok. A healthy fear of electricity will make you more cautious. It is a good thing to double and triple check your safety when working with electricity.
If you’re not comfortable working with electricity you can always hire an electrician.
Here’s what you will need:
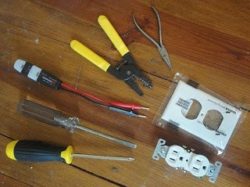
Needle nose pliers with rubber or plastic handles*
Flat head screwdriver*
Phillips head screwdriver*
Wire Strippers*
Wire cutter*
Voltage tester
15 amp/ 125 volt or 20 amp/ 120 volt duplex outlet
Outlet cover
* It is safest to work with tools that have rubber or plastic handles that won’t conduct electricity.
We highly recommend performing outlet replacements during daylight hours.
- Turn off the power to the outlet you are working on.
Hopefully your switches are labelled. If not, its helpful to leave a light plugged in while you are trying to figure out which switch turn off which circuit. If up see that the light has gone off, you know you are on the right track.
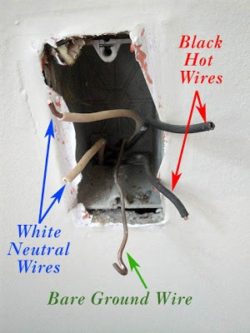
Note that just because two outlets are in the same room, it doesn’t necessarily mean that they are on the same circuit. Plus, it is possible for the top and bottom of one outlet to be on separate circuits. Always check both the top and bottom of an outlet before you work on it.
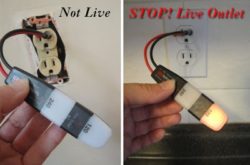
- Be sure. Take out your voltage tester. Insert a probe into each of the top two holes. If the tester lights up, there is still power to the outlet. If it doesn’t light up, then check the bottom outlet as well. Still no light? Perfect, the power is off to your outlet.
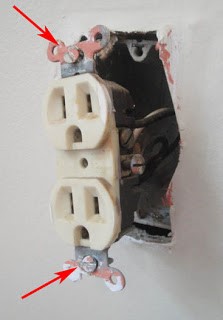
- Remove the face plate from your outlet by unscrewing the middle screw.
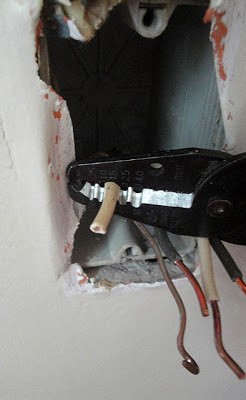
- Unscrew the two mounting screws as shown below.
- Gently pull the outlet out of the receptacle box. Inspect the outlet and see if you have the same amp replacement outlet. (Usually there are marking denoting 15A 125V or 20A 120V on the silver tabs, on the back or near the screw hole in the middle of the outlet.)
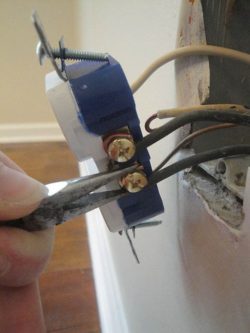
- Note which wires are attached to the outlet and where. Then make a drawing if you need to of their position. Or work by transferring one wire at a time.
- If the wires are wrapped around screws (lucky you), unscrew your wires and skip to step 10. If your wires are poked into holes in the back of the outlet, you may choose to try to release them by poking a flat head screwdriver into the slot next to the wire, or you will need to cut the wires as close to the outlet as possible.
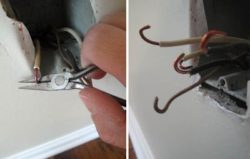
- Now strip about 1/4 inch of the insulation from the end of your wire. Gently use your wire strippers to clamp down on the wire being sure it is scoring the insulation. If you need to, rotate your wire strippers 90 degrees and cut through the insulation again. Then, while the strippers are still around the wire, pull gently towards the end of the wire to remove the cut insulation.
- Next take your needle nose pliers and grasp the end of your wire and twist the end to make a shepherd’s hook shape. Do this for all your remaining wires.
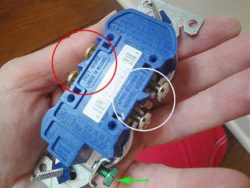
- Looking at the back of your new replacement outlet, you will see that one side has silver screws and/or markings on the back that say white wire. The other side of the outlet should have gold screws and/or markings indicating hot wires (the black wires). There is also one screw towards the bottom that is green. This screw is for your bare or ground wire. Hook each of your wires around the appropriate screw (Gold Screws = Black wires, Silver screws = White wires, Green screw = bare or green wire).
- Using your needle nosed pliers, pinch your wires tightly around the screws attempting to close the loop. Tighten each screw being sure that the wire stays tightly wrapped around the screw.
- When all your wires have been screwed tightly onto the outlet, you can gently push your outlet back into the receptacle box. Try to rock the outlet in by alternately pushing on the top and then the bottom. If your outlet doesn’t go in, pull it out and rearrange the wires so they fold neatly behind the outlet and try again.

- Screw in the mounting screws.
- Replace the face plate.
Now you can turn the power back on and plug something in to make sure your outlet works!